I hope you love my little projects, Please take a look at my shop, you might find something you can’t live without ! Please be aware that there may be some affiliate links in this post, where if you click on them I might make a small commission but in no way does this affect your cost of the item. It does however help support my time and effort. Thank you for stopping by SIMPLY LOVELY THINGS!
I’m here sharing a little Fall inspired pillow , ( I know spring is just getting under way here in the north), sharing the love of pumpkins and a quilt block. I love working with solids, sometimes solids provide an amazing pop of color. White, black and orange always amazing and this little pop of marine and lagoon green from Michael Miller couture cotton.( you can purchase them in my shop here for Marine
This project took me about 6 hours start to finish, I hope you enjoy!
First I made the little churn dash for the pumpkin. I love working with small blocks. Each Block is 1 1/2 inch finished, you will need 4 solid whites and 1 solid black square measuring 2 inch each.
Then for 1/2 square triangles, I make mine by cutting larger squares, sewing and then trimming, If you do it different then go for it, they just need to measure 2”


My method- I cut 2 squares of each color 21/2 inch each, on the white squares mark a line from one corner to the diagonal corner.
Right sides together the white and a black, sew 1/4 inch away from the line on each square,( step 2 pic) turn around and sew 1/4” away on the other side, rotary cut on the drawn line, (step3 pic)press to black and then with a small square ruler with a diagonal marking line trim each square to 2 inches, you should have 4.
Assemble the churn dash by rows, ( look at picture for reference)
The pumpkin is machine appliqués. To make it be a pumpkin the churn block gets big chunks of orange added to all 4 sides and then we cut out the pumpkin shape. So to the sides of the churn dash I added a 5 inch by 3 1/2 inch then you need to add top and bottom pieces that measure 11 1/2 by 3 1/2.

 Download your pattern. I use freezer paper for tracing, you need to reverse your patterns, to do this place your print out page on a window facing out ( notice front is backwards in my picture). Use the freezer paper to trace your pumpkin and stump , paper side to you to trace on.
Put your pattern shiny side down center on the wrong side of your pumpkin and churn block, press with a hot iron and you will have a nice seal with your pattern to your block. Because this is appliqué you can really do any shape pumpkin that fits into the 12 1/2 inch white square.


Trim your pumpkin and stump with about 1/4 inch seam allowance and make small clips where there are curves( I did the whole pumpkin). Finger press your seam allowance over the freezer paper pattern and then press with a hot iron and actually if you have starch hit it with starch first.
Pull out your pattern when the fabric is dry( if you used starch), Also see the dotted line on your stump? well you don’t need to do anything with that just make sure its cut long enough, your pumpkin will cover that raw edge.
For machine applique I used Superior monopoly super fine thread.
Use a new top stitch needle 75/10 and small zig zag I did 1 length x 2.3 width , its fairly tiny and the thread does leave a little bit of shine. I just placed my pumpkin on the 12 1/2 inch square white plain solid block, pinned in place and the stump went in behind the pumpkin. I actually removed the pumpkin, stitched the stem and then put the pumpkin back on and stitched in place.


Then add your green borders, You need 4 strips 1 1/2 inch by 12 1/2 and 4 darker green squares that are 1 1/2inch. Sew 2 dark green squares to each end of 2 strips. Sew the strips without the dark green first to sides of pumpkin, make sure to press seams and then add the top and bottom order, I know the block is on point, ( step 16)
Ok so this is where it gets math confusing, because of the on point thingy.
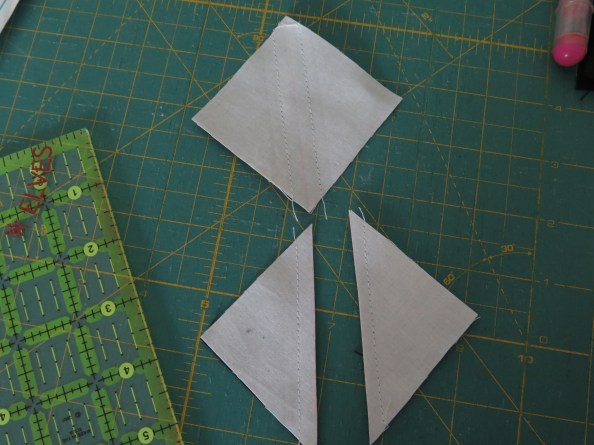
To make the corner pieces that will make your piece square you will need to make 4 half square triangles like we did in the beginning. I used 7 inch squares of 2 whites and 2 blacks, mark the corner to corner, sew 1/4 inch away each side, and cut line, trim to 5 1/2 inch square, to make the base white triangles, I cut a white square that was a generous 5 1/2 inch ( because I like to trim up) cut in half on the diagonal.
When sewing these white triangles to the square you need to line up with the black part of the square.


 Once both triangles are attached to the black half square triangle its time to trim up the bottom by placing 1/4inch mark at the seam where they all meet, I also made sure a solid line of the ruler lined up with the black edge, you can see in the photo


When you sew this section onto the green border, find the center of the green border, make a finger press crease and then pin the 1/4 inch seam of the black white block to the crease, I apologize for the blurry.
Make a quilt sandwich , for me I love to do free motion feathers, I love to just draw a simple curved line and then just make my feathers. First I just did a stitch in the ditch and some 1/8 inch echo quilting to the churn clock. The surrounding the pumpkin is the feathers and some stippling. In the triangle corners it was done free motion with some curly q type ribbons, The black triangle is just a simple curved triangle.
For finishing, I added jumbo rickrack from Hobby lobby, you could do piping as well, and then i finish my pillow backs like an overlapping sleeve. I cut 2 large rectangles 20 1/2 by 26 inch fold in half wrong sides together, to make then 13 by 20 1/2, you overlap them and then place your pumpkin square right side down and pin well, sew 1/4 inch away, and then turn right side to, pull at the corners to pull the pic rack out.


